Motive vs Corrective Waves Explained
Quick Navigation
INTRODUCTION
You’ve probably seen traders talking about “wave counts” and “Elliott Wave patterns.” But here’s the harsh truth: 95% of traders get wave counting completely wrong and it all starts with not understanding one fundamental concept.
That concept is this: Elliott Wave has TWO modes, not one. And if you don’t know the difference between them, your entire wave count falls apart.
In this guide, I’m going to show you exactly what these two modes are, how to spot them instantly, and most importantly how this one distinction changes your entire trading approach. By the end, you’ll understand why most traders fail at Elliott Wave while the successful ones nail their trades consistently.
Let’s break it down.
WHAT ARE MOTIVE WAVES? (The Trending Mode)
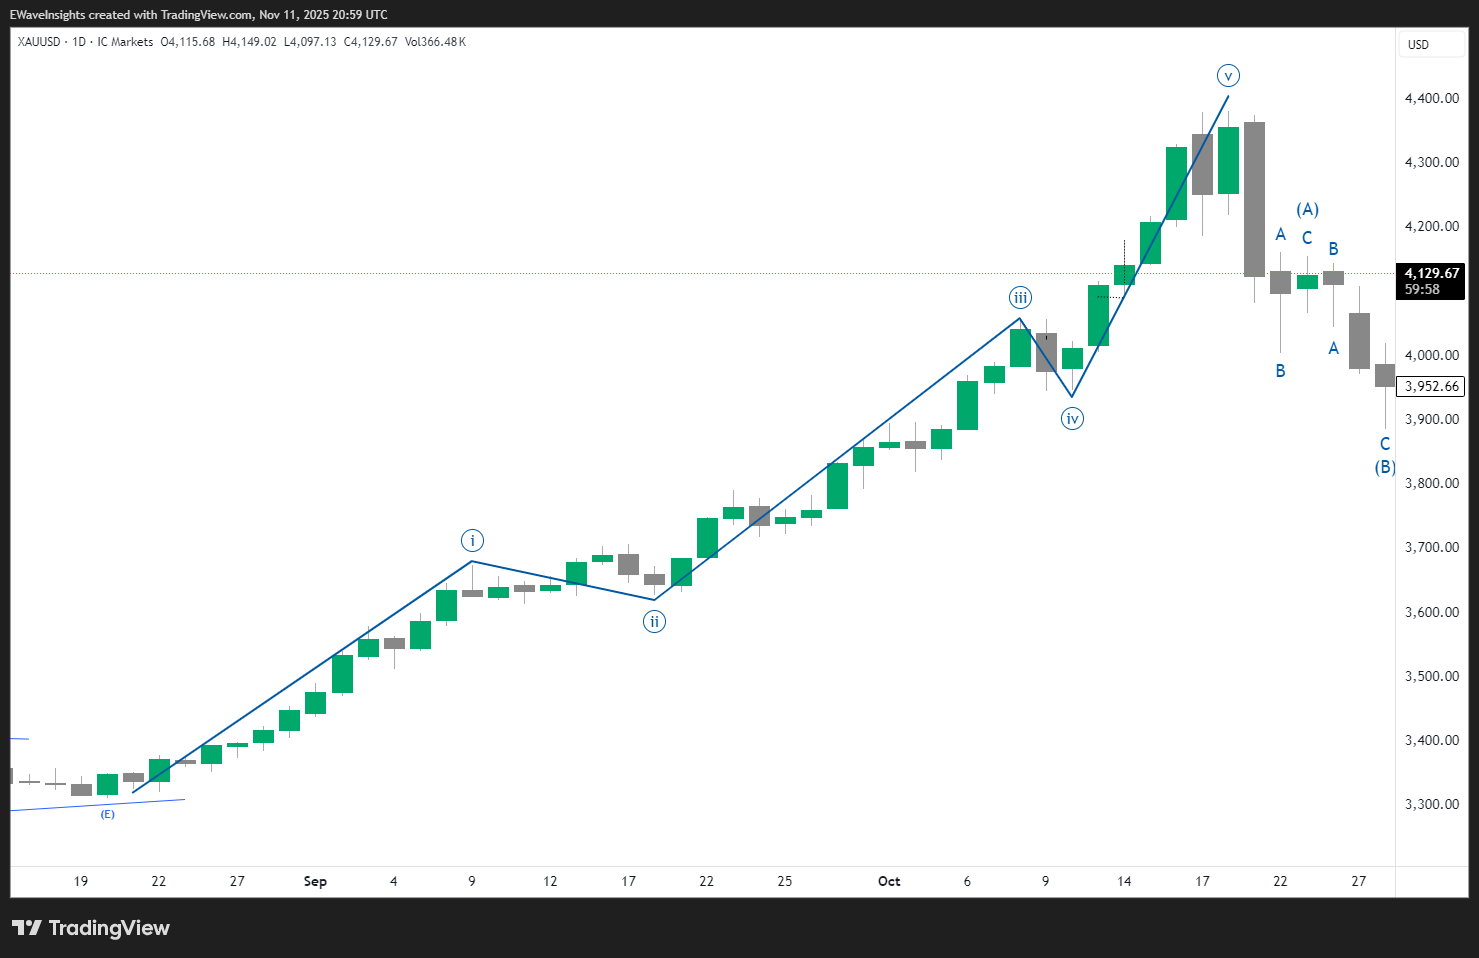
Motive waves are the powerhouses of price movement. They’re the moves that create profits for disciplined traders.
Here’s the definition: A motive wave is a 5-wave structure that moves in the direction of the primary trend.
Think about it this way: if you’re in an uptrend, a motive wave moves UP. If you’re in a downtrend, a motive wave moves DOWN. The key is that it always moves with the trend, not against it.
The structure looks like this:
- Wave 1: The market initiates the move up (or down)
- Wave 2: A pullback/correction (but doesn’t erase Wave 1)
- Wave 3: The power move the biggest impulse (this is where traders make money)
- Wave 4: Another pullback (but doesn’t erase Wave 3)
- Wave 5: The final push to complete the trend
Real Example: Imagine Gold is at $4,000. A motive wave might look like:
- Wave 1: $4,000 → $4,100 (initial move up)
- Wave 2: $4,100 → $4,050 (pullback)
- Wave 3: $4,050 → $4,250 (BIG move up this is where you make money)
- Wave 4: $4,250 → $4,200 (another pullback)
- Wave 5: $4,200 → $4,300 (final push to complete)
The Psychology: Motive waves represent greed and momentum. Early traders jump in (Wave 1), weak hands sell (Wave 2), serious money enters (Wave 3), profit-takers exit (Wave 4), and the last buyers rush in (Wave 5). That’s the natural progression of a trending market.
Why This Matters: When you’re IN a motive wave, you should be aggressive. Full position size. This is your opportunity to make real money. Most traders miss the entire Wave 3 because they don’t recognize they’re in a motive wave structure.
WHAT ARE CORRECTIVE WAVES? (The Consolidation Mode)
Corrective waves are the consolidation periods between trends. They’re where the market catches its breath—and where unprepared traders get trapped.
Here’s the definition: A corrective wave is a 3-wave structure that moves AGAINST the primary trend.
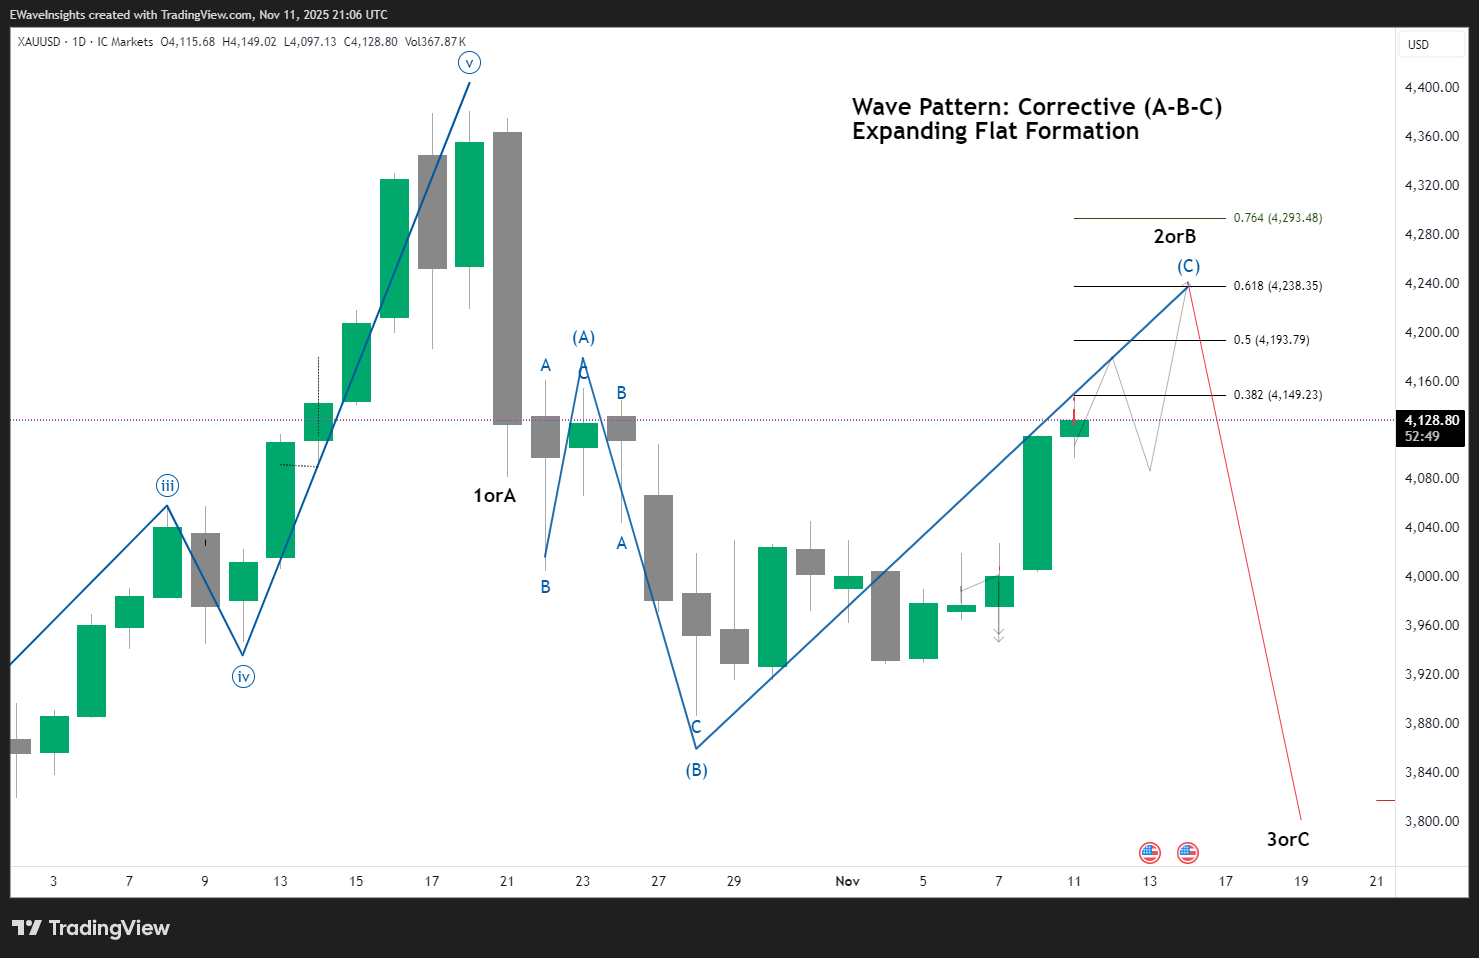
If you’re in an uptrend, a corrective wave moves DOWN. If you’re in a downtrend, a corrective wave moves UP. The key difference is that it always moves against the trend (temporarily).
The structure looks like this:
- Wave A: The initial move against the trend
- Wave B: A bounce back into the previous trend
- Wave C: The final push in the corrective direction
Real Example: After that Gold motive wave completed at $4,300, the market needs to correct. A corrective wave might look like:
- Wave A: $4,300 → $4,150 (down move against the uptrend)
- Wave B: $4,150 → $4,225 (bounce back up)
- Wave C: $4,225 → $4,100 (final down move to complete correction)
The Psychology: Corrective waves represent fear and consolidation. Some traders take profits (Wave A down), bargain hunters buy the dip (Wave B up), and then profit-takers return (Wave C down). It’s a temporary disagreement about direction, not a reversal of the trend.
Why This Matters: When you’re IN a corrective wave, you should be defensive. Smaller position size. Tighter stops. This is consolidation territory not where the big money is made. Most traders hold too long during corrections and give back their gains.
THE KEY DIFFERENCE: DIRECTION & PURPOSE
This is where everything clicks into place. Let me lay out the clearest comparison:
| Aspect | Motive Wave | Corrective Wave |
|---|---|---|
| Structure | 5 waves | 3 waves |
| Direction | WITH the trend | AGAINST the trend |
| Purpose | Create new price levels | Consolidate/retrace |
| Psychology | Greed, momentum, conviction | Fear, profit-taking, uncertainty |
| Time Duration | Typically longer | Typically shorter |
| Magnitude | Larger moves | Smaller moves |
| How to Trade | AGGRESSIVE (full size) | DEFENSIVE (smaller size) |
| Where Money is Made | Wave 3 (motive) | Early wave C (corrective) |
The Critical Insight: These two modes are the entire foundation of Elliott Wave analysis. If you can identify which mode you’re in, everything else becomes clear. Your entries, exits, position sizing, risk management—it all flows from understanding whether you’re in a motive or corrective wave.
HOW TO IDENTIFY EACH (Visual Clues)
Okay, so knowing the theory is one thing. But how do you actually spot these on your charts in real-time? Here are the practical ways to identify each mode:
IDENTIFYING MOTIVE WAVES:
1. The 5-Wave Count
- Most obvious: count 5 distinct waves going in one direction
- If you see 5 clear waves with identifiable turning points, you’re likely in a motive wave
2. The Wave 3 Power Move
- Wave 3 should be stronger than Wave 1
- It’s the most “powerful” looking wave on the chart
- Often extends beyond where you’d expect based on Wave 1
- Volume typically increases significantly during Wave 3
3. Clear Pullbacks with Structure
- Waves 2 and 4 are recognizable pullbacks
- They don’t erase the previous wave
- Wave 2 never fully erases Wave 1 (this is a RULE)
- Wave 4 never fully erases Wave 3 (this is a RULE)
4. Time Duration
- Motive waves take longer to develop
- They have multiple sub-waves
- On a 1-hour chart, could take 3-6 hours
- On a daily chart, could take 5-10 days
5. Angle/Aggressiveness
- Motive waves move with conviction
- The angle is steep and directional
- Not choppy or sideways
- Clear trend is obvious
IDENTIFYING CORRECTIVE WAVES:
1. The 3-Wave Count
- Most obvious: you can identify A-B-C moves
- Only 3 main turning points
- Simpler structure than motive waves
2. Movement Against Trend
- The move opposes the previous motive wave
- If previous was up, this is down
- If previous was down, this is up
- Clear reversal is obvious at the start
3. Variable Angles
- Wave A might be steep, Wave B shallow, Wave C steep
- Or all three similar angles
- Depends on the corrective pattern (zigzag, flat, triangle)
- Less consistent than motive waves
4. Time Duration
- Corrective waves are typically quicker
- On a 1-hour chart, could be 1-2 hours
- On a daily chart, could be 2-5 days
- Generally faster than motive waves
5. Choppy Price Action
- More back-and-forth movement
- Less directional
- Lots of small wicks and indecision
- Feels “sideways” compared to motive waves
THE TRADING DIFFERENCE: AGGRESSIVE vs DEFENSIVE
Here’s where this knowledge becomes money in your pocket (or saves you from losses):
TRADING MOTIVE WAVES (AGGRESSIVE):
When you identify a motive wave, you’re in the “money zone.” This is where you want to be most aggressive.
Setup:
- Enter after Wave 2 completes
- You’ve confirmed the uptrend and the pullback held support
- Place your stop just below Wave 2 low
- Target is Wave 3 extension (usually 1.618 × Wave 1 = your first target)
- Hold for Wave 3, exit partial profits near Wave 4 start
Position Sizing: 100% (go full size, this is your opportunity)
Example Trade (Gold):
- Wave 1: $4,000 → $4,100 (100 pip move)
- Wave 2: $4,100 → $4,050 (pullback)
- Entry: $4,055 (after Wave 2 low is confirmed)
- Stop: Below $4,050 (5 pip stop)
- Target 1: $4,161.80 (1.618 × 100 pips from Wave 1 base)
- Risk: 5 pips | Reward: 160+ pips
- Risk/Reward: 1:32 (that’s a trade you want!)
TRADING CORRECTIVE WAVES (DEFENSIVE):
When you’re in a corrective wave, you’re consolidating. This is NOT where you want to make your big bets.
Setup:
- Enter early in Wave C after Wave B completes
- Wave A confirmed the move against the trend
- Wave B bounced but couldn’t hold the trend
- Place stop above Wave B high (further away, more conservative)
- Target is Wave C completion
- Smaller position, quicker exit
Position Sizing: 50% (half size, this is consolidation)
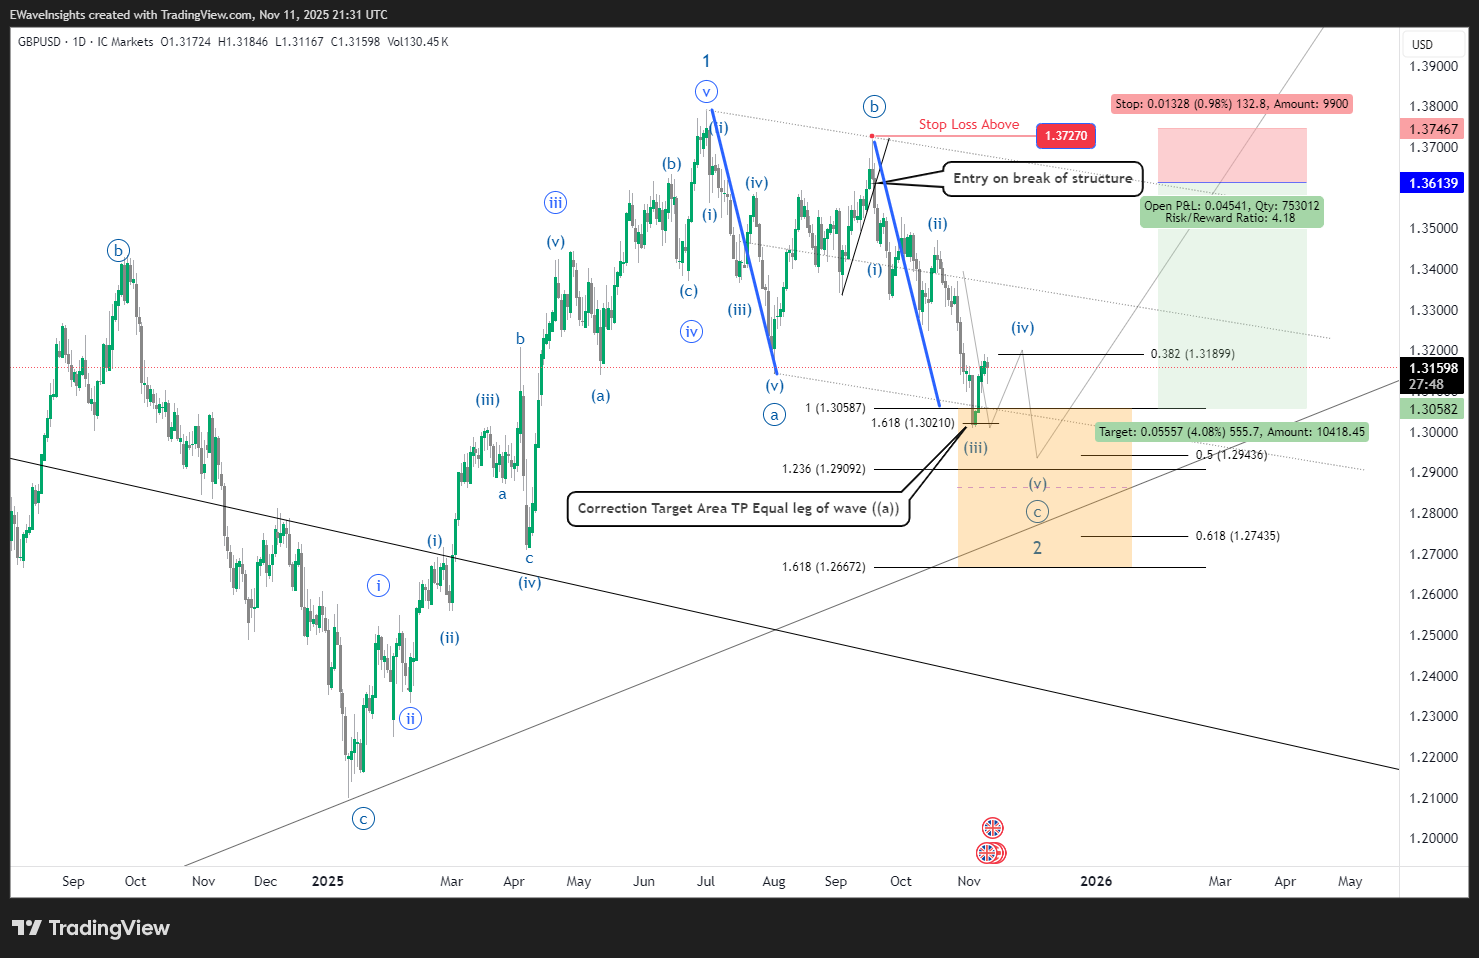
Example Trade (GBP/USD – Corrective Wave Setup):
- Wave A: 1.3850 → 1.3050 (down against uptrend – 800 pips)
- Wave B: 1.3050 → 1.3180 (bounce up – 130 pips / ~16% retrace)
- Entry: 1.3170 (after Wave B high is confirmed lower)
- Stop Loss: Above 1.3190 (tight stop on bounce failure – 20 pips)
- Target: 1.2800 (Wave C completion = 100% of Wave A – 370 pips from entry)
- Risk: 20 pips
- Reward: 370 pips
- Risk/Reward Ratio: 1:4.18 ✓ (Good for consolidation trade)
The Key Difference: You make your serious money in motive waves (especially Wave 3). Corrective waves are where you consolidate profits and wait for the next motive wave setup. A trader who understands this avoids holding corrective positions too long and conserves capital for the big moves.
COMMON MISTAKES TRADERS MAKE
Mistake #1: Confusing the Two Modes
- Trader sees a 3-wave move and thinks it’s a motive wave
- Places a full-size trade expecting Wave 3 extension
- But it’s actually a corrective wave, not a motive wave
- Trade fails because the corrective pattern completes
Mistake #2: Trading Too Aggressively in Corrective Waves
- Trader enters a corrective wave with full position size
- Confuses consolidation for a new trend
- Gets trapped when the correction completes
- Should have been defensive, not aggressive
Mistake #3: Not Identifying Which Mode You’re In
- Trader is analysing wave counts but doesn’t know if it’s motive or corrective
- This leads to poor position sizing decisions
- Risk management suffers because they don’t know which waves to be aggressive in
Mistake #4: Ignoring the 5 vs 3 Wave Count
- Easiest way to tell: Count the waves!
- Motive = 5 waves
- Corrective = 3 waves
- If you count more than 5 waves, you might be zooming out too far or miscounting
WHY THIS FOUNDATION MATTERS
Before you move to more complex Elliott Wave concepts, you need this foundation locked in:
- Identifying motive waves tells you when to be aggressive
- Identifying corrective waves tells you when to be defensive
- Understanding the structure helps you place stops and targets correctly
- Knowing the psychology helps you understand why traders act the way they do
Every advanced Elliott Wave concept (extensions, truncations, diagonals, complex corrections) builds on this foundation. If you’re shaky on motive vs corrective, those advanced concepts will confuse you.
So spend time on this. Study motive vs corrective on your favourite trading pair. Stare at Gold charts and identify these two modes. Get comfortable spotting them automatically.
CONCLUSION & ACTION ITEMS
Here’s what you’ve learned:
✅ Motive waves = 5-wave trending structures (WITH the trend)
✅ Corrective waves = 3-wave consolidation structures (AGAINST the trend)
✅ The key difference = Direction, purpose, and how aggressively you trade them
✅ How to identify = Wave count, angle, time duration, and price action characteristics
✅ How to trade differently = Motive (aggressive/full size) vs Corrective (defensive/smaller size)
Your Action Items This Week:
- Pull up a chart (Gold, EUR/USD, or S&P 500)
- Identify the last 3 complete motive waves
- Identify the last 2 complete corrective waves
- Write down the structure of each (draw it out if needed)
- Practice on multiple timeframes
Next week, we’re diving into Impulse Waves and where the real money is made (Wave 3 extensions). But first, master this foundation.
Ready to take your Elliott Wave analysis to the next level? Join Elliott Wave Insights where we break down chart analysis daily, identify setups in real-time, and help you turn Elliott Wave theory into consistent profits.
Join Elliott Wave Insights Membership – Get daily analysis in live Discord community.
← Back
Return to Wave FoundationsNext Module →
Wave Degrees & Labelling


2 thoughts on “Motive vs Corrective Waves Explained”